Engineered Column ( Modeling > F2 >  Other > " Engineered Column ")
Tool summary :


The " OK " button is disabled (grayed out) to indicate a validation error. Hover the " OK " button with your mouse pointer to get a listing of settings you need to change on this window. When all settings are valid, the " OK " button is enabled. 
Red-colored highlighting identifies an entry that is invalid. You need to change that setting, or you will not be able to close this window using " OK ."
- " Properties " " Status " " OK " " Cancel " " Reset "
- Warning! Most changes that you make to engineered column materials outside of this window will cause this member to be made " Graphical ," and those changes will be lost if you make this member not graphical ("
 Graphical "). For this reason, you should clean up the engineered column using Model > Material tools only after you are certain that you will make no more changes on this window. You can change a custom member material's steel grade, color or surface finish without making the member graphical.
Also see :
- Custom members (topic)
page 1 | contents | F2 > other > engineered column | locate work points | top
Locating work points :
To add an engineered column (in Modeling ):
Method 1 : Press F2 or choose Model > Member > Prompt for Member Type , then double-click " Engineered Column " on the Member Type Selection window.
Methods 2, 3 & 4 : An Engineered Column icon can be added to your toolbar (classic) or ribbon (lightning). The icon, keyboard shortcut or context menu command can be found in the group named ' Model -- Member '. For lightning, Customize Interface is used to configure ribbons, keyboards, the context menu and modes.
Two work points are required to lay out an engineered column.
The two work points need to be in vertical alignment. If you try to locate two points that are in non vertical alignment, the second point is automatically translated to be in vertical alignment with the first located point. Engineered columns are perfectly vertical columns.
To add an engineered column in a plan view, you can locate the same point twice then adjust the " Eave height " and/or the " Fixed floor elevation ."
To add an engineered column in an elevation view, the first point you locate should be at a lower elevation that the second point.
The elevation ( Z global axis ) of the second work point can be adjusted on the Engineered Column edit window using the " Eave height " " Purlin depth " and " Girt depth ." Consequently, where you locate the 2nd point is less important than where you locate the 1st point. The 2nd work point positions the top, outside corner of the web plate.
The two settings that you will probably want to adjust first on the Engineered Column edit window are the " Eave height " and the " Rotation ." Standard practice is to adjust the " Rotation " so that the inside flange of the engineered column faces the interior of the building, where its splice plate can connect with an engineered rafter.
page 1 | contents | F2 > other > engineered column | locate work points | top
------ General information ------
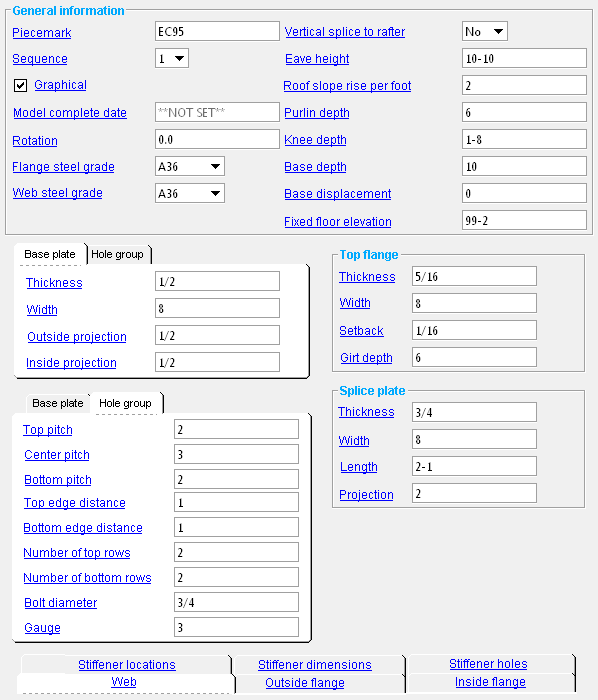
Piecemark: The member piecemark of the engineered column.
Typing in characters makes the piecemark a user piecemark .
To clear a user piecemark, or if you are adding a new engineered column, leave this field blank. Piecemarking will assign a system piecemark when you press " OK ."
Sequence: Any sequence name from the Sequence Names setup list can be entered. Either type the sequence, or you can press the "file cabinet" browse button ( ![]() ) and double-click any sequence name that is on the list.
) and double-click any sequence name that is on the list.
Tip: If you want to add a new sequence so that it can be selected here, you should first increase the number of " Maximum sequences " that are available.
Graphical : You should check this box when you no longer want the engineered column to undergo Process and Create Solids . For example, when you are ready to begin manually modifying the member using Edit Material , material cutting operations, or etc. Click here for more information.
Model complete date: read-only . The " Model completed " status of this member can be set using Update Attributes . You cannot set the " Model complete date " here, on this window.
' **NOT SET** ' indicates that this window is fully editable.
' month day year ' indicates that all fields on this window are in a disabled , read-only state due to the " Model completed " date having been set on this member, using Update Attributes , not necessarily on the reported date.
Also see: " Model complete date "
Rotation: A positive (+) or negative (-) number of degrees. Standard practice is to rotate an engineered column so that its inside flange faces the interior of the building, where the column's splice plate can connect with the splice plate of an engineered rafter.
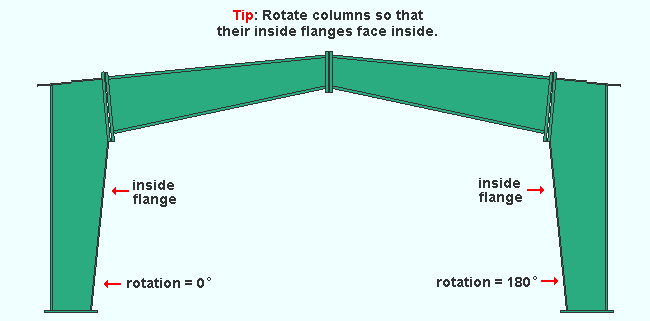
' 0 ' degrees is the default rotation for a newly added column.
A ' positive number ' rotates the column counterclockwise from the zero position that number of degrees.
A ' negative (-) number ' rotates the column clockwise from the zero position.
Flange steel grade: The " Steel grade " of various rectangular plates that make up this engineered column member. These rectangular plates include the member's inside and outside flange plates, stiffener plates, base plate, splice plate and top flange plate.
|
Selecting ' Materia l' as the selection filter and double-clicking an engineered column's inside flange, stiffener, base plate or outside flange opens the Rectangular Plate Material window. You'll find that the " Steel grade " on that window matches the " Flange steel grade " that is entered here. |
Web steel grade: The " Steel grade " of the engineered column's web plate(s). A single engineered column can have multiple web plates when multiple " Web " plates are specified.

|
Selecting ' Materia l' as the selection filter and double-clicking an engineered column's web opens the Multi-sided Flat Plate Material window. The " Steel grade " on that window will match the " Web steel grade " that is entered here. |
Vertical splice to rafter: Yes or No . This applies when the " Roof slope rise per foot " is non-zero. If the roof is flat, then either ' Yes ' or ' No ' generates a vertical splice plate.
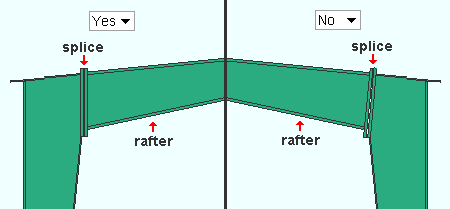
' Yes ' orients the splice plate vertically.
' No ' orients the splice plate perpendicular to the slope of the roof.
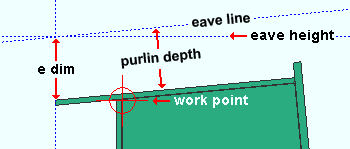
Eave height: The distance (in the appropriate " Units ") from the bottom work point (1st located work point) to the top work point plus the vertical distance to the top, outside corner of the top flange plate plus the e dim.
|
The e dim is the vertical dimension from the top, outside corner of the top flange to the eave line. The eave line is the " Purlin depth " distance from the top flange. |
If the " Roof slope rise per foot " is zero, the top flange will be horizontal, and the eave height will be the work point to work point distance plus the thickness of the top flange plate plus the purlin depth.
Note: Changing the " Purlin depth " or the " Eave height " or the " Girt depth " changes the elevation ( Z axis global coordinate ) of the engineered column's top work point.
Roof slope rise per foot: A positive or negative (-) distance (in the primary dimension " Units " or other units ) that describes the slope of the top flange. Changing this value can affects the actual slope of the top flange.
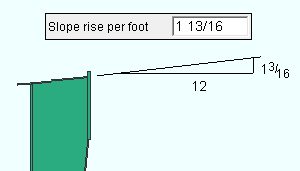
' A positive distance ' slopes the top flange of the engineered column up, away from the base plate and toward the interior flange.
' A negative distance ' slopes the top flange of the engineered column down, toward the base plate and toward the interior flange.
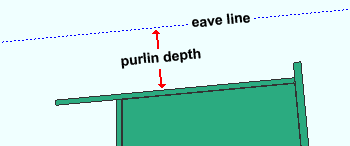
Purlin depth: The actual distance (in the primary dimension " Units " or other units ) from the top flange to the eave line. The distance can be measured perpendicular to the top flange at any point along the top flange.
|
The eave line is the " Purlin depth " distance from the top flange. See " Eave height ." |
Note: Changing the " Purlin depth " or the " Eave height " or the " Girt depth " changes the elevation ( Z axis global coordinate ) of the engineered column's top work point.
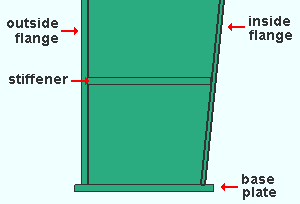
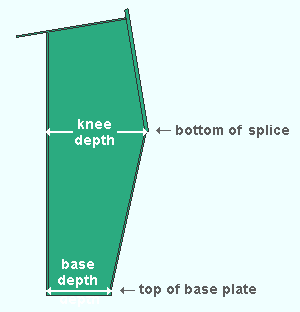
Knee depth: The horizontal distance (in the primary dimension " Units " or other units ) from the outside edge of the web plate at the bottom of the splice plate to the inside edge of the web plate at the bottom of the splice plate. Assuming that you have rotated the column so that its inside flange faces the interior of the building, the web plate's inside edge is the edge that faces toward the interior of the building.
|
The knee depth in this example is the depth of the web plate at the location where the web plate is most wide. That location is at the elevation of the bottom of the splice plate. Consequently, changing the splice plate " Length " repositions the elevation at which the " Knee depth " is measured. |
Base depth: The horizontal distance (in the primary dimension " Units " or other units ) from the outside edge of the web plate at the top of the base plate to the inside edge of the web plate at the top of the base plate. Assuming that you have rotated the column so that its inside flange faces the interior of the building, the web plate's inside edge is the edge that faces toward the interior of the building.
|
|
The base depth in this example is the width of the web plate at the location where its width is most narrow. That location is along the top of the base plate. |
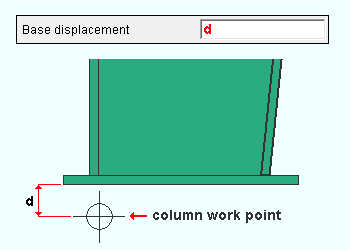
Base displacement: The vertical distance (in the primary dimension " Units " or other units ) from the bottom work point of the engineered column to the bottom edge of the base plate.
|
A " Base displacement " of ' 0 ' aligns the bottom of the base plate with the work point. Changing the " Base displacement " offsets the bottom end of the column from the work point, but does not move the work point. |
Fixed floor elevation: The bottom-end elevation of the column's bottom work point (in the primary dimension " Units " or other units ).
This is the Z axis global coordinate of the 1st work point that was located. Changing the " Elevation " moves the work point's Z coordinate to that elevation. The top, left end of the web plate will be located at this point.
If the " Base displacement " is ' 0 ', then this elevation is also the bottom elevation of the work point.
Changing the " Fixed floor elevation " moves the work point to that elevation.
To determine the fixed floor elevation on an engineered column in the 3D model, use Construction Line Add or a similar tool, select EXPT as the Locate option, then move the point location target to the work point at bottom end of the column and reference the Z coordinate reported in the X-Y-Z display .
page 1 | contents | F2 > other > engineered column | locate work points | top
| Base plate | Hole group |
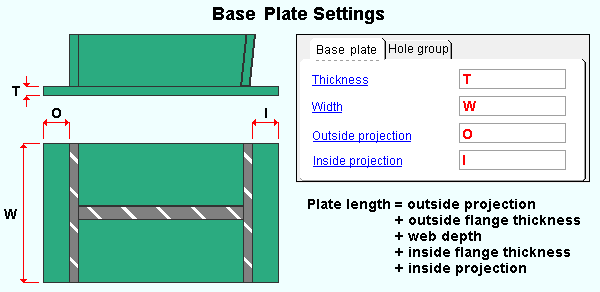
Thickness: A distance (in the primary dimension " Units " or other units ). This is The " Material thickness " of the rectangular plate that is the base plate at the bottom end of the engineered column. The steel grade for this plate is the " Flange steel grade ."
Width: A distance (in the primary dimension " Units " or other units ). This is the " Material width " of the rectangular plate that is the base plate at the bottom of the engineered column. The center of the width dimension is the web centerline. Increasing the width adds material to both the near side and far side of the web centerline.
Outside projection: The distance (in the primary dimension " Units " or other units ) that the base plate projects beyond the outside flange of the engineered column. Assuming that you have rotated the column so that its inside flange faces the interior of the building, the base plate's outside flange is the flange that faces away from the building.
Inside projection: The distance (in the primary dimension " Units " or other units ) that the base plate projects beyond the inside flange of the engineered column. Assuming that you have rotated the column so that its inside flange faces the interior of the building, the base plate's inside flange is the flange that faces toward the interior of the building.
| Base plate | Hole group |
Under Construction.
page 1 | contents | F2 > other > engineered column | locate work points | top
------ Top flange ------
Thickness: A distance (in the primary dimension " Units " or other units ). This is The " Material thickness " of the rectangular plate that is the engineered column's top flange plate. The steel grade for this plate is the " Flange steel grade ."
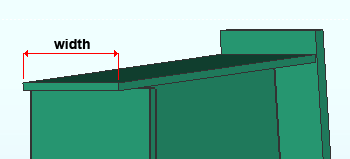
Width: A distance (in the primary dimension " Units " or other units ). This is the " Material width " of the rectangular plate that is the engineered column's top flange plate.
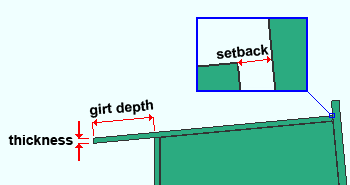
Setback: The distance (in the primary dimension " Units " or other units ) that the top flange is set back from the splice plate.
Girt depth: The distance (in the primary dimension " Units " or other units ) that the top flange projects beyond the outside flange of the column. .
Note: Changing the " Purlin depth " or the " Eave height " or the " Girt depth " changes the elevation ( Z axis global coordinate ) of the engineered column's top work point.
page 1 | contents | F2 > other > engineered column | locate work points | top
------ Splice plate ------
Thickness: A distance (in the primary dimension " Units " or other units ). This is the" Material thickness " of the rectangular plate that is the splice plate. The steel grade for this plate is the " Flange steel grade ."
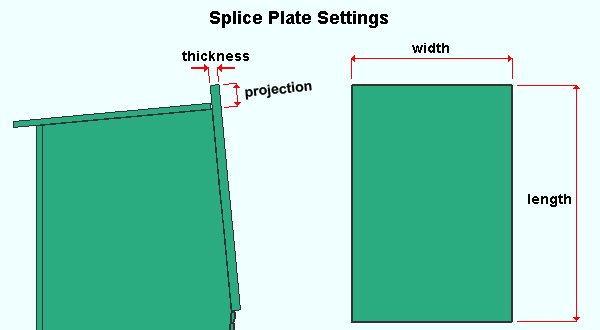
Width: A distance (in the primary dimension " Units " or other units ). This is the " Material width " of the rectangular plate that is the splice plate.
Length: A distance (in the primary dimension " Units " or other units ). This is the " Order length " of the rectangular plate that is the splice plate.

|
As this illustration shows, changing the " Length " of the splice plate changes the elevation of the " Knee depth ." |
Projection: The distance (in the primary dimension " Units " or other units ) that the splice plate projects above the inside, top corner of the web plate. Increasing this distance slides the splice plate up. Consequently, if you change the " Projection " distance, you may also want to also adjust the " Length " of the splice plate in order to keep the " Knee depth " at the same elevation.
page 1 | contents | F2 > other > engineered column | locate work points | top
| Stiffener locations | Stiffener dimensions | Stiffener holes |
| Web | Outside flange | Inside flange |

Height: Multi-sided Flat Plate is used as the web plate material. The shape of that multi-sided flat plate is calculated based on the following.
The location of the first work point (bottom end) and the " Purlin depth " and " Eave height " and " Girt depth " position the outside, left corner of the engineered column's web. That outside left corner is where the column's 2nd work point is located.
The elevation of the corner of the web plate that is at the highest elevation is calculated based on the " Roof slope rise per foot ." The top flange plate and the splice plate are at 90 degrees to one another.
The web plate's maximum width (measured horizontally) is its " Knee depth ."
The web plate's narrowest width (measured horizontally) is its " Base depth ."
Any entry you make to " Height " will be ignored. The above-described parameters are sufficient to set the height and shape of the web plate.
Thickness: A distance (in the primary dimension " Units " or other units ).
This is the " Material thickness " of the Multi-sided Flat Plate Material that is the engineered column's web plate.
page 1 | contents | F2 > other > engineered column | locate work points | top
| Stiffener locations | Stiffener dimensions | Stiffener holes |
| Web | Outside flange | Inside flange |
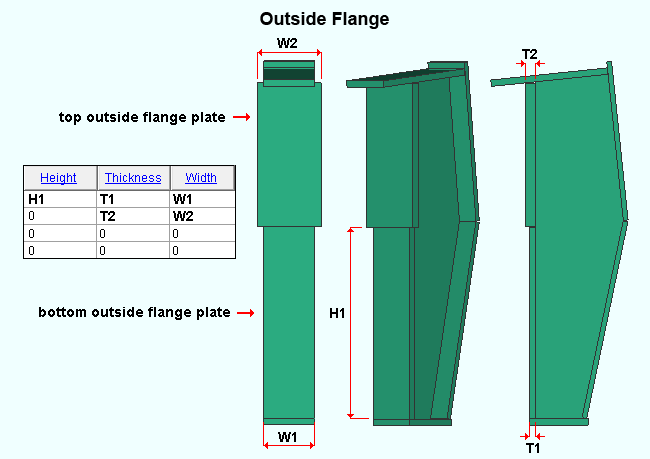
Height: A distance (in the primary dimension " Units " or other units ).
A " Height " creates a rectangular plate of that specific " Order length " to serve as a part of the engineered column's outside flange. If you enter a " Height " of ' 0 ', Engineered Column automatically calculates the " Order length " that is required to fill in the available total outside flange length.
The " Height " specified in the table's 1st row is the " Order length " of the bottom outside flange plate. This " Height " is measured from the top of the base plate to where the bottom of the next outside flange plate begins.
In the example shown above, a " Height " of ' 0 ' is specified in the 2nd row. This instructs Engineered Column to calculate the length that is required to fill the remaining total outside flange length. Note that non-zero " Thickness " and " Width " are made in the 2nd row. Such entries are required to enable Engineered Column to generate a rectangular plate that is a thickness and width that is different than the thickness and width specified in the 1st row.
If you wanted a single plate to be used for the entire outside flange, you could specify ' 0 ' for the " Length " in the 1st row then enter a " Thickness " and " Width " to that same row and leave all other cells in the table blank.
If you wanted a two plates of the same thickness and width to be used for the entire outside flange, you could specify the " Length " of the first plate in the 1st row then enter a " Thickness " and " Width " to that same row and leave all other cells in the table blank. The bottom outside flange plate would be the specified length, and the top outside flange plate would be the automatically calculated length.
To get three plates of the same thickness and width to be used for the entire outside flange, specify the " Length " of the first plate in the 1st row then enter a " Thickness " and " Width " to that same row. For the second row, enter a " Length " and the same " Thickness " and " Width " you entered in the 1st row. Then enter 0 to all other cells in the table. The bottom outside flange plate would be the length you specified in the top row, the middle outside flange plate would be the length you specified in the middle row, and the top outside flange plate would be a length that is automatically calculated to fill up the remaining space.
In summary, always enter a " Length " that when added to the " Length s" entered in previous rows is less than or equal to total length of the outside flange. For the last row in which you also fill out a " Width " and " Thickness ," enter ' 0 ' to instruct Engineered Column to automatically calculate the length that is required.
Thickness: A distance (in the primary dimension " Units " or other units ).
This is The " Material thickness " of the rectangular plate that is the " Length " specified in this same row of the " Outside flange " table.
You should enter a " Thickness " for each row in the table that has a specified non-zero " Length " and " Width ." Also, if ' 0 ' is specified in a " Length " row in order to instruct Engineered Column to automatically calculate the length of plate required to fill in the available space at the top of the outside flange, you can enter a " Thickness " and " Width " for that plate.
Width: A distance (in the primary dimension " Units " or other units ).
This is the " Material width " of the rectangular plate that is the " Length " specified in this same row of the " Outside flange " table.
You should enter a " Width " for each row in the table that has a specified non-zero " Length " and " Thickness ." Also, if ' 0 ' is specified in a " Length " row in order to instruct Engineered Column to automatically calculate the length of plate required to fill in the available space at the top of the outside flange, you can enter a " Thickness " and " Width " for that plate.
page 1 | contents | F2 > other > engineered column | locate work points | top
| Stiffener locations | Stiffener dimensions | Stiffener holes |
| Web | Outside flange | Inside flange |
Height: A distance (in the primary dimension " Units " or other units ).
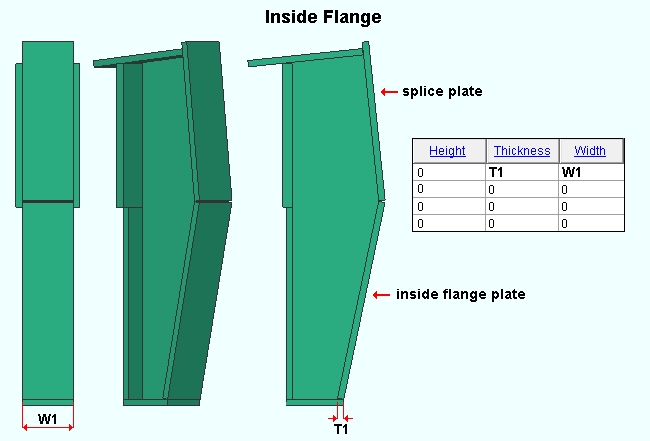
A " Height " specifies that Engineered Column create a rectangular plate of that specific " Order length " to serve as a part of the engineered column's inside flange. If you enter a " Height " of ' 0 ', Engineered Column will automatically calculate the " Order length " that is required to fill in the available total inside flange length.
The total inside flange length is the distance from the top of the base plate to the splice plate.
In the example shown above, a " Height " of ' 0 ' is specified in the 1st row. This instructs Engineered Column to create an outside flange plate that is total inside flange length. Note that non-zero " Thickness " and " Width " are made in the 1st row. Such entries are required to enable Engineered Column to generate a rectangular plate that is the specified thickness and width.
For more information, see the outside flange " Height ." The inside flange " Height " works in much the same way.
Thickness: A distance (in the primary dimension " Units " or other units ).
This is the " Material thickness " of the rectangular plate that is the " Length " specified in this same row of the " Inside flange " table.
You should enter a " Thickness " for each row in the table that has a specified non-zero " Length " and " Width ." Also, if ' 0 ' is specified in a " Length " row in order to instruct Engineered Column to automatically calculate the length of plate required to fill in the available space at the top of the inside flange, you can enter a " Thickness " and " Width " for that plate.
Width: A distance (in the primary dimension " Units " or other units ).
This is the " Material width " of the rectangular plate that is the " Length " specified in this same row of the " Inside flange " table.
You should enter a " Width " for each row in the table that has a specified non-zero " Length " and " Thickness ." Also, if ' 0 ' is specified in a " Length " row in order to instruct Engineered Column to automatically calculate the length of plate required to fill in the available space at the top of the outside flange, you can enter a " Thickness " and " Width " for that plate.
page 1 | contents | F2 > other > engineered column | locate work points | top
| Web | Outside flange | Inside flange |
| Stiffener locations | Stiffener dimensions | Stiffener holes |
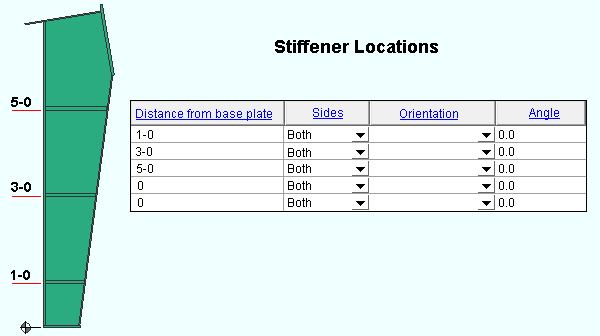
Distance from base plate: The distance (in the primary dimension " Units " or other units ) that the stiffener (or double stiffeners) are to be placed from the bottom end of the base plate.
The stiffeners are placed in line with the interior of the inside flange if their " Type " is ' Full from inside ' or ' Partial from inside '. The stiffeners are placed in line with the interior of the outside flange if their " Type " is ' Full from outside ' or ' Partial from outside '.
Sides: Both or Near Side or Far Side .
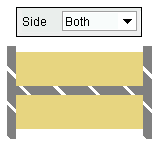
|
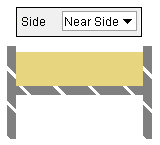
|
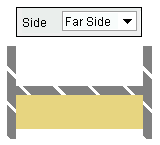
|
|
These three examples look at the column from its bottom end, above its base plate. The outside flange is the left flange. The inside flange is the right flange.
|
||
' Both ' places the stiffeners on both the near side and far side of the web of the column.
' Near Side ' places the stiffeners on the near side of the web.
' Far Side ' places the stiffeners on the far side of the web.
Orientation: Horizontal or Angle from inside or Angle from outside .
' Horizontal ' orients the stiffener horizontal to the world. Any " Angle " that you enter for a stiffener that is set to ' Vertical ' will be ignored.
' Angle from inside ' orients the stiffener perpendicular to the inside flange when the " Angle " is set to ' 0 ' (zero).
' Angle from outside ' is the same as ' Horizonta l' when the " Angle " is set to ' 0 ' (zero). Entering an ' Angle ' other than ' 0 ' rotates the stiffener the specified number of degrees.
Angle: A positive or negative (-) number of degrees . This applies only to stiffeners whose " Orientation " is set to ' Angle from inside ' or ' Angle from outside '.
' 0 ' (zero) orients the stiffener perpendicular to the inside flange when the " Orientation " is set to ' Angle from inside '. It orients the stiffener perpendicular to the outside flange when the " Orientation " is set to ' Angle from outside '.
' A positive or negative non-zero value ' rotates the stiffener from its zero position that number of degrees.
Note: Any " Angle " you enter here is ignored when the stiffener's " Orientation " is set to ' Vertical '.
page 1 | contents | F2 > other > engineered column | locate work points | top
| Web | Outside flange | Inside flange |
| Stiffener locations | Stiffener dimensions | Stiffener holes |

Type: Full from inside or Full from outside or Partial from inside or Partial from outside .
' Full from inside ' generates a full-depth stiffener that is flush from the inside flange. You may enter a " Setback " from the outside flange.
' Full from outside ' generates a full-depth stiffener that is flush from the outside flange. You may enter a " Setback " from the inside flange.
' Partial from inside ' generates a stiffener that is the " Length " that you enter. The stiffener will be flush with the inside flange.
' Partial from outside ' generates a stiffener that is the " Length " that you enter. The stiffener will be flush with the outside flange.
Length: The distance (in the primary dimension " Units " or other units ) that is the " Order length " of the rectangular plate that is the stiffener.
For a ' Full from inside ' or ' Full from outside ' stiffener, the " Length " is calculated automatically when you press " OK ." If you enter a " Length ," your entry will be overridden when you press " OK ."
For a ' Partial from inside ' or a ' Partial from outside ' stiffener, Engineered Column will, when you press " OK ," generate the stiffener that is the " Length " that you enter.
Width: The distance (in the primary dimension " Units " or other units ) that is the " Material width " of the rectangular plate that is the stiffener.
Thickness: The distance (in the primary dimension " Units " or other units ) that is The " Material thickness " of the rectangular plate that is the stiffener.
Setback: The distance (in the primary dimension " Units " or other units ) that a full-depth stiffener will be set back from the top or bottom flange.
For a ' Full from inside ' stiffener, this distance is the gap between the stiffener and the outside flange.
For a ' Full from outside ' stiffener, this distance is the gap between the stiffener and the inside flange.
For a ' Partial from inside ' or a ' Partial from outside ' stiffener, a setback is not applicable . Any entry you make to " Setback " will be reset to ' 0 ' (zero) when you press " OK ."
page 1 | contents | F2 > other > engineered column | locate work points | top
| Web | Outside flange | Inside flange |
| Stiffener locations | Stiffener dimensions | Stiffener holes |
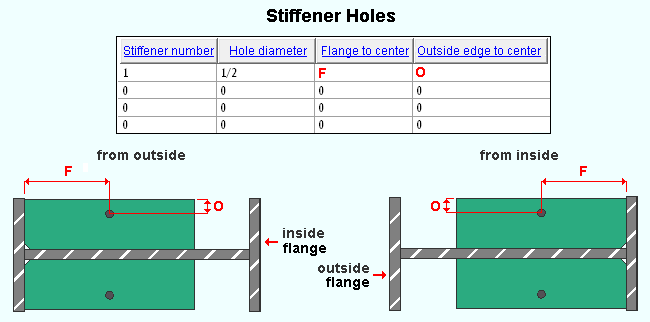
Stiffener number: 1 or 2 or 3 , etc. The stiffener whose position is specified in the 1st row under " Distance from base plate " is stiffener number 1. Stiffener number 2 is the stiffener specified in the 2nd row.
This number identifies the stiffener to which a hole is to be applied.
The number refers to a set of double stiffeners when ' Both ' is the stiffener's " Sides ." A hole defined on a line for double stiffener will be applied to both the near- and far-side stiffener.
To define two holes for the same stiffener (or the same pair of stiffeners), you need to enter the same stiffener number to two separate lines.
No stiffener is ever assigned the number 0. Changing the " Stiffener number " to ' 0 ' stops the hole definition on that line from being applied to any stiffener.
Hole diameter: The diameter of the hole in the stiffener(s) whose " Stiffener number " is specified for this line. You can enter a hole diameter in the primary dimension " Units " or other units .
![]() dia = hole diameter
dia = hole diameter
Flange to center: The distance (in the primary dimension " Units " or other units ) that the hole is centered from the interior of the outside flange or from the interior or the inside flange.
This dimension is measured from the interior of the inside flange when 'Partial from inside' or 'Full from inside' is the stiffener " Type ."
This dimension is measured from the interior of the outside flange when 'Partial from outside' or 'Full from outside' is the stiffener " Type ."
Outside edge to center: The distance (in the primary dimension " Units " or other units ) that the hole is centered from the outside edge of the stiffener. The outside edge is the stiffener edge that farthest from the web of the engineered column.
page 1 | contents | F2 > other > engineered column | locate work points | top
"Properties" opens the Edit Properties window, on which you can make entries to custom properties . If, at the time it was created, your current Job was set to use a legacy flavor, the window that opens is named Custom Properties , not Edit Properties .
The Edit Properties window can also be used to read "
Log " entries or review or type "
The " Properties " button is disabled ( grayed out ) when a new custom member is being added.
Tip: Model > Member > Properties is an alternative to this button. It opens the Edit Properties window directly, without your first having to open a member edit window.
" Status " opens the Member Status Review window, which can give you additional information about this engineered column, and which you can use to enter status information.
"OK" (or the Enter key) generates the engineered column member per the settings entered on this window.
If the " OK " button is disabled (grayed out), click here for more information.
The " Piecemark " that is shown, if it is a system piecemark, may change after you press " OK ." If there is no " Piecemark " shown, a system member piecemark will be assigned after you press " OK ."
"Cancel" (or the Esc key) closes this window and ends the Add Engineered Column or Edit Engineered Column operation. If you were adding a new engineered column, no engineered column will be added. If you were editing an engineered column, the member will remain unchanged.
"Reset" undoes any changes made since you first opened this window.
page 1 | contents | F2 > other > engineered column | locate work points | top